How To Create Gamepass In Roblox For Robux
Roblox developers can monetize their games by offering Gamepasses—one‑time purchases that give players special abilities, items, or access to exclusive areas. In this tutorial I show you the exact steps to create a Gamepass, set its price in Robux, and manage sales efficiently. Whether you are a beginner or an experienced creator, you will learn how to turn your ideas into real revenue.
What Is a Gamepass?
A Gamepass is a virtual product tied to a specific Roblox place. When a player buys the pass with Robux, the purchase is permanent for that account, and the player receives the benefits you define. Gamepasses differ from Developer Products, which are consumable items sold repeatedly.
Benefits of Using Gamepasses
- Predictable income: Each purchase is a one‑time payment, so you know exactly how much each player contributes.
- Enhanced gameplay: Offer exclusive weapons, skins, or VIP zones that keep your community engaged.
- Easy management: Roblox automatically tracks ownership, so you don’t need a separate database.
- Cross‑promotion: Combine Gamepasses with badges or events to boost player retention.
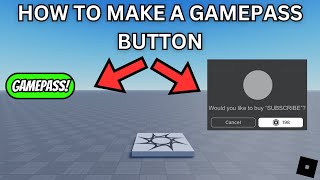
Step‑By‑Step Guide to Creating a Gamepass
Follow these instructions to publish your first Gamepass. In todays video I show you how each screen looks, but the written steps below work just as well.
1. Prepare Your Asset
- Design an image that represents the Gamepass. The image must be a PNG file, 150 × 150 pixels, and under 1 MB.
- Upload the image to Roblox via the Create → Decals page. Copy the asset ID; you will need it later.
2. Open the Developer Dashboard
- Log in to Roblox and click Create at the top of the page.
- Select the game you want to add the Gamepass to, then click Configure Game.
3. Add a New Gamepass
- In the left sidebar, choose Game Passes.
- Click Create New Game Pass. A form appears where you will enter the details.
- Paste the image asset ID, give the pass a clear name (e.g., “VIP Sword”), and write a concise description that explains the benefits.
- Set the price in Robux. The minimum is 25 Robux; higher prices can be used for premium features.