How To Screenshot In My Windows: A Complete Guide
Capturing what’s on your screen is a routine task for anyone who works on a PC. Whether you need to save a receipt, share a bug report, or create a tutorial, Windows offers a variety of built‑in tools that let you take screenshots quickly and accurately. In this article we’ll walk through every method, so you can choose the one that fits your workflow.
Why Knowing Multiple Screenshot Methods Matters
Relying on a single shortcut can limit your productivity. There are a number of ways to take screenshots in Windows, each designed for different scenarios—full‑screen grabs, custom region captures, or video clips. Mastering these options means you’ll spend less time searching for the right tool and more time getting results.
Standard Keyboard Shortcuts
1. Print Screen (PrtSc) – The Classic Approach
The simplest method is to press the Print Screen key. This copies the entire screen to the clipboard, and you can paste it into any image editor (such as Paint) or document.
- Press PrtSc on your keyboard.
- Open an app like Paint or Word.
- Press Ctrl + V to paste the image.
- Save the file in your preferred format.
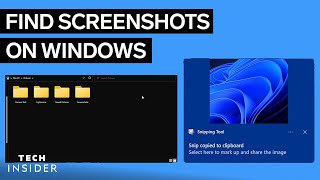
2. Windows + PrtSc – Direct Save to the Screenshots Folder
If you prefer an automatic save, hold the Windows key and tap PrtSc. Windows creates a “Screenshots” folder inside your Pictures library and stores a PNG file there.
- Location: C:\Users\YourName\Pictures\Screenshots
- File name: Screenshot (date & time).png
3. Alt + PrtSc – Capture the Active Window
When you only need the foreground window, press Alt + PrtSc. The image is placed on the clipboard, ready for pasting.
Using the Snipping Tool and Snip & Sketch
4. Windows + Shift + S – The Quick Snip Shortcut
In Windows 10 and 11, the Windows + Shift + S combination launches the Snip & Sketch overlay. A small toolbar appears at the top of the screen, offering four capture modes:
- Rectangular Snip – Drag to draw a rectangle.
- Freeform Snip – Draw any shape with your mouse.
- Window Snip – Click